

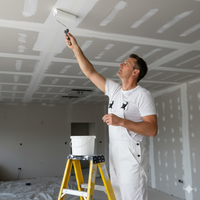






















A drywall sander helps smooth joint compound, patched areas, and other imperfections before primer and paint. Choosing the right type depends on the size and height of the surface, how much sanding you need to do, your comfort with powered tools, and how well you can control dust. For contractors finishing whole rooms, a powered pole model may save effort; for a small patch, a hand sander can offer better control with less setup.
Call Integrity Supply with a question about painting and jobsite supplies
What a drywall sander does—and what it does not do
Drywall sanding is a finishing step. It reduces ridges, tool marks, and rough transitions in dried joint compound so the surface is ready for inspection and, after any needed touch-ups, primer. A sander cannot make a poorly filled joint flat by itself. If a seam has a deep groove, a loose tape edge, a raised fastener, or a broad uneven area, adding or repairing compound may be more effective than removing more material with sandpaper.
Work toward a smooth, even surface rather than trying to polish every square inch until it is perfectly featureless. Excess sanding can expose drywall paper, damage tape, create depressions, or leave a repair that is more visible after painting. Shine a work light across the wall at a low angle to reveal high spots and scratches, but judge the finish in the lighting the room will actually have as well.
Drywall sander types: choose for the job
Hand sanding block or pole sander
A hand block is a straightforward choice for a small repair, corners, detail work, and areas where a powered tool feels difficult to control. A pole sander puts the abrasive head at the end of a handle, making it easier to reach broad wall areas and many ceilings without repeatedly climbing a ladder. It needs no motor or dust-extraction connection, though it still creates airborne dust and requires deliberate cleanup and protection.
Hand sanders reward a light touch. Keep the pad flat and move it steadily across the compound. A block is usually easier to guide over a limited patch; a pole can cover a larger area efficiently, but excessive pressure or an angled head can dig into the surface or leave arcs. Take time to learn the pivoting head before working over a finished joint.
Powered pole drywall sander
A powered drywall sander is designed to move an abrasive head across a larger surface with less manual effort. Many models use a long handle for walls and ceilings, and some can connect to a dust extractor. Speed settings, head movement, weight, reach, and the way the head articulates vary by tool. Read the manual to understand suitable surfaces, compatible abrasives, operating speed, and dust collection requirements.
Powered sanders can remove compound quickly, so they are not automatically the best choice for every job. A beginner may find it harder to control pressure and keep the head flat, particularly near corners, edges, outlets, or delicate paper. Practice on a small, inconspicuous area or scrap board and use the least aggressive approach that achieves the finish you need.
Compact detail sanders and sanding sponges
A sanding sponge or compact hand tool can be useful for tight spaces, small repairs, inside corners, and localized touch-ups. Sponges can conform to shapes, but that flexibility can also round an edge that should stay crisp. Use a clean abrasive face and avoid pressing a corner into the compound. For detailed repair work, a guide to patching a hole in drywall can help you consider the repair steps that come before sanding.
Use the right abrasive and change it when needed
Abrasive choice affects how quickly material comes off and how likely you are to leave scratches. Coarser abrasives cut faster but can gouge or mark a finish; finer abrasives remove material more slowly and are generally useful for light smoothing. The best grit depends on the compound, how dry it is, how uneven the surface is, and the sander maker’s instructions. Check the tool and abrasive labels rather than assuming every product uses the same numbering or attachment.
- For pronounced ridges or rough initial work: Use a suitable, moderately coarse abrasive only where necessary, with a light hand. Remove prominent defects carefully instead of aggressively sanding an entire wall.
- For general smoothing: A medium abrasive is often a practical starting point for dried joint compound. Test a small area and inspect the result before continuing.
- For final touch-ups: A finer abrasive can soften minor marks after the surface is already close to flat. It is not a substitute for another coat of compound where a low spot remains.
Replace a loaded, torn, or worn abrasive. Clogged abrasive may glide without cutting effectively, tempting you to push harder; that extra pressure can leave uneven marks. Keep abrasive appropriate to the sander, secure it as directed, and do not use a damaged pad. Avoid switching abruptly to a very coarse grit on a nearly finished surface, because deep scratches may show through paint.
Control drywall dust before you start
Drywall sanding can release fine dust that spreads beyond the immediate work area. Dust control is both a cleanliness measure and a safety measure. Plan for containment and collection before sanding, rather than relying on cleanup afterward. If you are working in an occupied building, consider how dust could reach other rooms, HVAC returns, belongings, or people who are not wearing protection.
- Prepare the area. Remove or cover belongings, protect floors, and close off the work zone where practical. Do not block required exits. Turn off or isolate air movement that would carry dust into other areas, following the building and equipment instructions.
- Use compatible extraction. If the sander supports dust collection, connect it to a compatible extractor or vacuum with filtration intended for fine dust. Confirm that hoses, adapters, bags, and filters are suitable for the tool and material, and keep the filter maintained according to the manufacturer’s directions. A household vacuum is not automatically suitable for drywall dust.
- Check the setup as you work. Look for loose connections, a full bag, clogged filter, or dust escaping at the head. Stop and correct the problem rather than continuing with ineffective collection. Do not modify a tool or vacuum in a way its instructions do not allow.
- Clean with dust in mind. Use methods designed to collect fine dust, such as a suitable filtered vacuum, instead of dry sweeping that can stir it back into the air. Follow product and site guidance for cleanup and disposal.
Dust-extracting equipment can reduce airborne dust, but it does not guarantee a dust-free workspace or replace personal protective equipment. Check the compound packaging and safety data sheet (SDS) for ingredient and handling information. If the material or building conditions raise concerns you cannot assess, pause and seek qualified safety guidance before sanding.
Wear appropriate protective equipment
At minimum, protect your eyes from dust and wear respiratory protection appropriate to the material and exposure. A well-fitting respirator selected for the hazard can be important when fine dust is generated; the correct type, fit, maintenance, and use depend on the product, task, and workplace requirements. Follow the respirator manufacturer’s instructions and applicable workplace rules. Facial hair or a poor fit can interfere with some respirators, so do not assume that simply wearing one ensures protection.
Also consider hearing protection when using powered tools, work gloves if appropriate to the tool, and clothing that limits dust contact with skin. Keep the sander cord and extraction hose arranged so they do not create a trip hazard. Take breaks if the tool’s weight, overhead position, or repeated movement is causing fatigue. Never remove a guard or defeat a safety feature to make the tool easier to use.
Prepare the surface for sanding
Let joint compound dry as directed before sanding. Sanding compound that is still damp can smear, clog the abrasive, or pull at the finish. Remove protruding screws or nails only after confirming the correct repair method, and check for electrical boxes, fixtures, and other obstructions. Keep the abrasive and powered head away from exposed wiring and avoid sanding into corners or edges where the tool can damage adjacent surfaces.
Use a work light to identify ridges and transitions. If the surface has a raised seam, carefully reduce only the high area; if it has a depression, fill it with compound and allow it to dry rather than trying to lower the surrounding wall. Where tape is exposed, torn, or lifting, stop and repair the joint. Sanding through the paper face can create a fuzzy or damaged area that needs patching and can make the final finish more difficult.
A practical sanding technique
- Test first. Confirm the compound is dry, the abrasive is attached correctly, dust collection is operating, and protective equipment is in place. Test the sander on a small area.
- Keep the head flat. Hold the pad evenly against the surface. Let the abrasive do the work; heavy pressure can cause gouges, swirl marks, or an uneven patch.
- Move continuously. Use smooth, overlapping passes instead of holding the head in one spot. Work in manageable sections and avoid abrupt changes in speed or pressure.
- Use controlled strokes near edges. Reduce pressure and slow down near corners, trim, outlets, and transitions. A hand block may give better control in delicate areas than a powered pole sander.
- Stop and inspect often. Wipe or vacuum the surface using a suitable method, then view it under oblique light. Feel for a sharp ridge only after removing dust and taking care not to rub the compound excessively.
- Touch up instead of over-sanding. If a low spot, pinhole, or damaged area remains, apply compound as appropriate, let it dry, and sand lightly again. Do not keep grinding down the surrounding board to chase a defect.
For ceilings, consider reach, tool weight, overhead fatigue, and a stable working position. Do not lean from a ladder to reach farther; reposition safely or use an appropriate tool setup. Stop if dust collection fails, the tool behaves unexpectedly, or you cannot maintain control.
Final inspection and cleanup
Inspect the entire area from more than one angle, including transitions at corners and around repairs. Look for ridges, scratches, exposed paper, loose tape, and missed pinholes. A surface can appear smooth under one light and show imperfections under another, so check under lighting similar to what the finished room will use. Make necessary compound touch-ups before applying primer.
Remove dust from the work area and surface using a compatible collection method and follow the coating manufacturer’s preparation instructions before priming. Avoid applying primer over a visibly dusty surface. Clean and store the sander, hose, and protective equipment according to their instructions; inspect the cord, pad, and dust collection components before the next use.
Quick checklist: choosing and using a drywall sander
- Match tool to scope: hand block for detail or small repairs, pole sander for broader hand sanding, and powered pole sander for larger areas when you can control it safely.
- Match abrasive to the finish: follow tool guidance, test first, and use the least aggressive grit that works.
- Prepare the space: contain dust where practical and protect people, belongings, and adjacent areas.
- Collect dust: use compatible extraction and filtration, keep it maintained, and stop if it is not working properly.
- Protect yourself: use suitable eye and respiratory protection; consider hearing protection and follow equipment and workplace instructions.
- Sand gently: keep the head flat, use overlapping passes, and inspect frequently rather than applying more pressure.
- Repair defects: fill low spots and fix damaged tape or paper instead of sanding away sound drywall.
- Prepare for primer: clean the surface appropriately and follow the coating maker’s directions.
Frequently asked questions
Is a powered drywall sander worth it for one room?
It depends on the room size, the amount of compound to smooth, the tool’s weight and reach, and your experience. A powered pole sander can make broad work less tiring, but it needs setup, compatible dust extraction, and a careful touch. For one small repair or detailed area, a hand block or sanding sponge may be easier to control.
What grit should I use on drywall compound?
There is no single grit that suits every compound, sander, and stage of work. A medium abrasive is a common starting point for smoothing dried compound, while a finer one may be used for light finishing. Follow the sander and abrasive instructions, test a small area, and avoid coarse abrasives on a nearly finished surface.
Can I sand drywall without a vacuum?
You can hand-sand without powered dust collection, but sanding still creates dust. Prepare and contain the work area, wear suitable eye and respiratory protection, and use a cleanup method that does not unnecessarily stir fine dust into the air. For a powered tool, follow its dust-collection requirements and do not use an incompatible vacuum.
How do I know when the wall is ready for primer?
Check that compound is dry, joints and patches are smooth and even, and there are no obvious ridges, deep scratches, exposed paper, or loose tape. Inspect under angled light, clean away dust appropriately, and follow the primer manufacturer’s surface-preparation directions. Touch up defects with compound rather than over-sanding the surrounding board.
Should I use a drywall sander on every wall imperfection?
No. Sanding is suitable for high spots and surface texture, but low spots, voids, loose tape, or damaged drywall paper may need repair or additional compound. For a good result, identify what caused the imperfection and choose the right correction instead of removing more material indiscriminately.
Call Integrity Supply for help with painting and construction supply questions
Whether you are finishing one patch or preparing multiple rooms, a measured approach produces a better surface: select a manageable tool, control dust, protect yourself, and inspect frequently. For broader purchasing and job planning, see Integrity Supply’s guide to organizing paint supplies for faster job turnarounds.