



















Choosing parking lot striping paint is not just a matter of picking a color. The coating must suit the pavement, weather, traffic plan, and application equipment, and the lot must be prepared and laid out before painting begins. This guide walks commercial maintenance teams and contractors through those decisions, from selecting a product to reopening the area.
Call to discuss painting supplies
What should parking lot striping paint do?
Striping paint creates visible lines and symbols that help drivers understand how a paved area is organized. A typical lot may need stall lines, directional arrows, stop bars, crosswalks, accessible parking markings, loading zones, or fire-lane markings. Each marking has a purpose, and the site owner or responsible authority should determine the layout and required markings before work starts.
For a maintenance project, the practical goal is a coating and application plan that produces clear, consistent markings on the actual pavement. No paint is right for every lot. Pavement condition, temperature, moisture, traffic, application method, and local requirements all influence the choice. Read the specific product label and technical data before buying or applying any coating. Do not assume that two products with the same general name have the same coverage, dry time, permitted surfaces, or equipment requirements.
Integrity Supply serves contractors and maintenance customers with a broad catalog spanning roughly 70,000 products from 300 manufacturers. The catalog includes painting, safety, hardware, and construction supplies; not every item is stocked in-house. For a striping project, confirm the current product specifications and availability for the particular coating and equipment you plan to use.
How do you choose parking lot striping paint?
Begin with the surface and the job conditions, not a generic promise about durability. Identify whether the pavement is asphalt or concrete, whether it is new or previously coated, and whether the existing lines are sound, faded, peeling, or contaminated. Then compare paint options against the surface compatibility and application instructions published for each product.
| Option to evaluate | What to check | When it may be considered | Key limitation |
|---|---|---|---|
| Waterborne traffic paint | Approved pavement types, temperature and moisture limits, application method, cleanup instructions, and dry or cure guidance | When its label and technical data identify it as suitable for the pavement and project conditions | Do not assume it can be applied in damp, cold, or rapidly changing weather; use the listed limits |
| Solvent-based traffic marking paint | Surface compatibility, ventilation and fire precautions, solvent handling, equipment compatibility, and recoat or reopening guidance | When the product documentation supports the intended surface and application conditions | Solvent-related handling and environmental requirements may affect whether it is appropriate at the site |
| Specialty marking material | Whether the material is intended for the location, traffic exposure, surface, and installation process | When the project specification calls for a particular marking material or performance characteristic | Some materials require specialized installation or equipment and are not a direct substitute for paint |
This table is a screening tool, not a product specification. Confirm the technical data sheet, safety data sheet (SDS), label, and project requirements for the exact product. If a product is described as suitable for pavement marking, still verify that the intended pavement type and application conditions are covered. Check any restrictions on use over existing coatings, curing compounds, sealers, or contaminants.
Match the coating to the pavement
Asphalt and concrete can differ in texture, porosity, age, and surface treatment. A fresh or recently treated surface may need to cure or otherwise meet product-specific preparation requirements before marking. Aged pavement may have loose aggregate, oil, dirt, tire residue, or old paint that interferes with adhesion. Concrete may have a smooth finish, curing residue, or other surface condition that affects the result.
Inspect a representative section. Note whether the substrate is sound, clean, dry, and compatible with the proposed coating instructions. Where the condition is uncertain, ask the coating manufacturer or supplier for guidance before committing to the entire lot. A small test area can help assess appearance and application behavior, but only perform one if the product instructions and site plan allow it. Do not treat a test patch as proof of long-term performance.
Consider weather, exposure, and traffic
Read the product's temperature range and restrictions for air temperature, pavement temperature, humidity, wind, and moisture. Conditions at the pavement may differ from the air temperature reported by a weather app. Sun, shade, wind, and overnight temperature changes can also affect the work window. A coating that can be applied in one set of conditions may not be appropriate later in the day.
Plan for the time needed to keep vehicles and pedestrians off the marked area. The product label may describe drying or curing stages, but the safe time to reopen a lot depends on the specific material, application thickness, weather, and site conditions. Follow the manufacturer's instructions and allow a margin for the actual environment. Do not promise a reopening time based on a general rule or another product's data.
What should you inspect before restriping?
A sound plan starts with a site walk. Take photos and notes, then identify work areas, access points, drainage, slopes, pedestrian routes, utilities, curbs, islands, and locations where vehicles must continue to enter or leave. Record visible defects that may affect paint or layout, such as loose pavement, standing water, cracks, potholes, oil spots, flaking material, or uneven patches.
- Check the surface: Identify asphalt or concrete, note repairs and coatings, and look for dirt, loose material, grease, water, or other contamination.
- Review existing markings: Decide which lines are to remain, be removed, or be covered. Avoid laying out new work over confusing old lines without a clear plan.
- Confirm the scope: List stalls, arrows, stop bars, crosswalks, accessible spaces, loading areas, and any other markings in the approved plan.
- Check drainage and access: Note low spots, slopes, entrances, exits, and routes that must stay usable during staged work.
- Set the work boundary: Identify how vehicles and pedestrians will be kept away from the active area and where supplies and equipment can be staged safely.
- Verify requirements: Have the property owner or responsible professional confirm applicable local rules, site specifications, and accessibility requirements before marking.
Do not use new striping to conceal a pavement problem. If the surface is deteriorated or contaminated, resolve the condition using an appropriate repair or cleaning plan before painting. If old markings must be removed, choose a removal method that is permitted for the pavement and setting. Grinding, blasting, or chemical removal can create dust, debris, or runoff; assess those hazards and follow applicable directions and controls.
How should you plan the layout?
Work from an approved layout rather than estimating each stall as you paint. A plan should show the lot's traffic flow and the location and dimensions of each marking. Verify the plan against the site and any applicable requirements before setting out lines. Parking-space dimensions, access aisles, crosswalks, fire lanes, arrows, and signs can be subject to rules that vary by place and property type.
For accessible parking, do not rely on memory or copy an old layout without checking it. The U.S. Department of Justice's ADA Compliance Brief on restriping parking spaces explains features of accessible car and van spaces and how many accessible spaces are required. Use the applicable federal, state, and local requirements and have the responsible person verify the project layout. The brief is guidance, not a substitute for checking the rules that apply to a particular property.
Once the plan is confirmed, translate it to the pavement with measurements and reference marks. Establish a baseline and use repeatable measurements for stall spacing. Check diagonals or other reference points where needed to keep rows square to the lot rather than following an irregular curb by eye. Use chalk, removable markers, string lines, or other layout tools only if they will not contaminate the substrate or conflict with coating instructions. Confirm that temporary marks can be removed or covered cleanly.
Walk the layout before opening paint. Check that stalls are consistent, drive lanes remain clear, arrows point in the intended direction, and markings do not end in a confusing location. Have a second person compare the marked layout with the approved drawing when the scope or site is complex. Corrections are easier before equipment is loaded and a lane is closed.
How do you prepare the pavement and work area?
Preparation is one of the most important parts of a striping job. Remove loose dirt, sand, leaves, and debris using a method appropriate for the site. Address oil, grease, and other deposits with a compatible cleaning process, then allow the pavement to dry as directed. If washing is used, plan for wastewater and runoff so contaminants do not enter drains or neighboring areas. Never assume that a surface is ready because it looks dry from a distance.
Remove loose or failing old paint where required. A new coat applied over peeling lines can fail along with the layer beneath it. Do not aggressively abrade sound pavement without a reason and a plan for dust and debris. Follow the coating manufacturer's instructions for recoating, and seek product-specific direction when the existing material is unknown.
Protect nearby surfaces and equipment from overspray and splashes. Select masking or protective materials that can be secured without leaving residue or damaging the substrate. For non-pavement protection and cleanup planning, products such as drop cloths may be relevant around staging or maintenance work, but confirm that any covering is suitable for the location and will not create a trip, slip, or traffic hazard. Do not place loose coverings where vehicles or pedestrians will cross.
Prepare the machine, spray tip, hoses, filters, and other components according to the equipment and paint instructions. Confirm compatibility before loading. Check that the selected tip and pressure are appropriate for the coating and the line width; do not assume settings from a different product will transfer. Keep the equipment clean and in serviceable condition. Bring enough approved paint for the planned work, but avoid opening more containers than needed before the crew confirms the setup and weather window.
What equipment and supplies may the crew need?
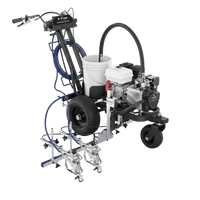
The exact list depends on the product and project. Many larger lots use a line striping machine designed for the selected traffic paint. Smaller or detailed work may call for a different approved application method. The equipment manual and paint documentation should agree on compatibility, setup, cleaning, and operating conditions.
- Approved striping machine or other product-compatible applicator
- Paint specified for the pavement and project
- Layout plan, measuring tools, and suitable temporary marking supplies
- Cones, barriers, and signs for a controlled closure and detour
- Cleaning tools and surface-preparation materials appropriate to the substrate
- Safety equipment and protective clothing identified by the SDS and site hazard assessment
- Spill-control and waste-handling supplies required for the product and location
Do not substitute ordinary wall-paint tools for a traffic striping machine unless the product's directions specifically permit the proposed method. A small paint brush can be useful for compatible detail or touch-up work if the coating instructions allow it, but it is not a replacement for suitable line-marking equipment on a full lot. Check the available painter's tape specifications before using tape for masking; ordinary tape may not adhere to pavement or tolerate outdoor conditions, and residue or edge bleed can affect the result. Use materials that suit the substrate and task.
How do you apply parking lot striping paint?
Follow the coating label and equipment manual from setup through cleanup. The sequence below is a planning framework, not a substitute for the directions for a specific product or machine.
- Close and secure the area. Put the traffic-control plan in place before mixing or loading paint. Keep customers, workers, vehicles, and pedestrians away from the active area. Maintain a safe route around the work where the site plan permits.
- Recheck conditions. Confirm the pavement and weather remain within the product's stated application limits. Delay work if conditions fall outside them or if unexpected moisture, wind, or traffic creates a risk.
- Set up and test the equipment. Use the specified setup and test the spray pattern on an approved test surface or area. Adjust only as the machine and product instructions allow. Check line width, consistency, and overspray before moving to the finished pavement.
- Paint in a planned sequence. Work from the layout and use consistent references. Choose a sequence that avoids walking or driving across fresh markings and allows safe access for the crew. Keep a steady pace appropriate to the equipment and product; stop to correct a developing problem rather than continuing a long run.
- Inspect while the work is manageable. Look for gaps, uneven edges, overspray, and inconsistent widths. Correct defects according to the product's recoat instructions. Do not add another coat simply to hide a problem without confirming compatibility and timing.
- Allow the prescribed drying or cure time. Keep the closure in place for the period specified by the manufacturer under the actual conditions. Make reopening decisions conservatively and according to the site plan.
- Clean and store equipment safely. Use the product-specific cleaning method, handle residues as directed, and leave the work area free of tools, containers, and debris.
If using aerosol or hand-applied material for a small marking, follow the same principles: confirm the product is intended for the pavement and marking, prepare a controlled area, and observe the specified application and reopening directions. Do not use a small-container product for a large commercial project unless the product documentation and project plan support that choice.
What safety steps belong in the plan?
Striping work takes place around moving vehicles, paint, equipment, and sometimes solvents. Complete a site-specific hazard review before the crew starts. The SDS describes product hazards, handling, storage, required protective measures, and spill response. Make it available to the people doing the work and follow its instructions along with applicable workplace and environmental rules.
- Separate the work from traffic. Use a closure and detour plan suitable for the property. Cones alone may not be sufficient for every traffic condition. Do not work in a live drive lane without appropriate controls and authorization.
- Protect workers from exposure. Select gloves, eye protection, clothing, and respiratory protection based on the product SDS and a competent hazard assessment. Do not assume one respirator or glove type is appropriate for every coating.
- Control ignition and ventilation hazards. If the product has flammable or solvent-related hazards, follow its specific storage, ventilation, and ignition-control directions. Keep containers closed when not in use.
- Prevent spills and runoff. Stage containers securely, keep response materials available, and protect drains and sensitive areas where required. Handle leftover paint, wash water, and contaminated materials according to product directions and applicable requirements.
- Plan for public access. Keep children, customers, and other visitors away from equipment and wet markings. Use signs and barriers that can be understood from a safe distance.
Do not rely on odor as a safety check, and do not mix products unless the manufacturer explicitly directs it. If the work area or coating presents hazards the crew cannot control, stop and get qualified safety guidance before proceeding.
How long does striping paint take to dry?
There is no single reliable dry-time answer for every striping paint. Drying and curing depend on the exact formulation, film thickness, pavement temperature, air temperature, humidity, airflow, and other conditions. The product label or technical data sheet is the source to use for stated times and limitations.
Distinguish between a surface that feels dry and a marking that is ready for vehicle traffic. Follow the manufacturer's definition and instructions for recoating and reopening. If conditions are near the edge of the permitted range, a thick application was made, or the surface remains tacky, keep the closure and seek product-specific advice rather than guessing. Build the schedule around the confirmed opening guidance, not the other way around.
How can you avoid common striping problems?
Most preventable problems begin with a mismatch between the surface, paint, equipment, or conditions. Use this troubleshooting list to identify what to check before repeating the work.
- Paint will not adhere: Check for moisture, dust, oil, loose old coating, or incompatibility with the pavement or existing material. Review surface-preparation and recoat directions before applying more product.
- Lines look ragged or uneven: Check the layout marks, equipment setup, spray pattern, speed, and pavement texture. Practice and make adjustments on an approved test area before continuing.
- Overspray reaches nearby surfaces: Revisit the closure and masking plan, wind conditions, applicator settings, and operator position. Protect adjacent areas without creating trip hazards or damaging finishes.
- Markings remain tacky: Check the application thickness and actual environmental conditions against the product documentation. Keep traffic off the area; do not add another layer until the instructions permit it.
- Old lines show through: Confirm whether the product and project plan call for removal, additional coats, or another preparation step. Do not apply extra paint without checking coverage guidance and recoat limits.
- Layout appears confusing: Stop and compare the work with the approved plan. Resolve errors before painting more lines or reopening the area.
Record the product name, lot or batch information if available, conditions, preparation, equipment setup, and application date. These notes can help the team evaluate a problem and make the next maintenance cycle more consistent. They also help separate a product issue from a preparation or application issue.
How should you maintain the markings?
Inspect the lot periodically and after pavement repairs, major weather events, or changes in traffic patterns. Look for faded or interrupted lines, confusing remnants, surface damage, and markings that no longer match how the property is used. A touch-up can be appropriate for isolated wear, but broad or inconsistent repairs may make the layout harder to understand.
Before repainting, confirm the surface is suitable and the new material is compatible with the existing coating. Recheck accessibility and other applicable requirements whenever the layout changes or spaces are restriped. Keep a record of the approved plan and maintenance work so that future crews do not have to reconstruct the intent from faded pavement marks.
How do project conditions affect parking lot striping paint?
Consider a small maintenance crew repainting a faded row of stalls in an otherwise serviceable lot. The team should first identify the existing pavement and paint, confirm the approved row layout, and check whether the proposed coating can be applied over the existing marks. If the surface is clean and sound and the product directions permit recoating, the work may be limited to preparation, layout verification, and controlled application. If the old coating is peeling or the surface is oily, painting directly over it can reproduce the failure rather than solve it. The coating label and surface condition should guide the decision.
A newly repaired section presents a different case. The repair material may have its own cure period or preparation requirement, so the crew should not assume it can be striped on the same schedule as older pavement. Confirm with the repair and paint manufacturers what conditions must be met before marking. If the repair has not reached those conditions, stage the project so the crew can complete other approved areas without painting the questionable section too soon.
A busy property may need the lot divided into smaller work zones. Phasing can preserve access, but it makes layout control more important. Mark the boundary between phases, keep a common reference line, and verify that the completed portion aligns with the next section. Communicate closures in advance, preserve emergency and pedestrian access where required, and do not reopen an area until the paint directions and site plan allow it. Avoid creating a temporary arrangement that could mislead drivers or conflict with the final plan.
Weather can change the decision even when the product and surface are otherwise suitable. A forecast that looks acceptable in the morning does not guarantee a usable application and curing window later. Check the pavement itself, the expected conditions during application, and the period the area must remain closed. Have a stop-work point: if moisture, temperature, wind, or traffic moves outside the product limits or the safety plan, pause rather than trying to finish at any cost.
For quantity planning, use the coverage information for the exact product and calculate from the actual marking plan. Include the lengths and widths of the planned lines and symbols, then account for the number of coats required by the product instructions. Surface texture, application method, line dimensions, and overspray can change the amount used, so treat an estimate as a planning figure rather than a guarantee. Confirm container sizes and availability before scheduling the crew. Do not convert a general rule of thumb into a purchase quantity when the product's own coverage data is available.
Finally, check who is responsible for approving the layout, setting traffic controls, handling waste, and authorizing reopening. A written handoff reduces uncertainty when the owner, maintenance team, and contractor share the work. Keep the approved drawing, product documentation, and site notes together so that the person applying paint is not forced to make design or safety decisions on the pavement.
What should you confirm before ordering?
Use this checklist to compare product information and coordinate the work before purchasing:
- What pavement type and surface condition will receive the paint?
- Does the product documentation approve that surface and any planned application over existing markings?
- What are the temperature, moisture, application, recoat, dry-time, and reopening requirements?
- Is the product compatible with the selected striping equipment, tip, and cleaning method?
- What quantity is needed based on the product's stated coverage and the actual layout? Confirm coverage assumptions with the manufacturer; do not estimate from a different paint.
- Are the colors, marking plan, accessibility details, and local requirements confirmed by the responsible person?
- How will the area be closed, protected, and reopened without exposing workers or visitors to wet paint or traffic?
- Are SDS, PPE, spill response, cleanup, and waste-disposal plans ready?
- Can the paint be applied and allowed to dry or cure within the available weather and closure window?
Clear answers to these questions make it easier to select the right product and avoid buying a coating that does not fit the job. If a specification is missing or product compatibility is unclear, confirm it before ordering or beginning work.
Call Integrity Supply for help with painting supplies
Frequently asked questions about parking lot striping paint
Can regular exterior paint be used for parking lot lines?
Do not assume that exterior building paint is suitable for pavement markings. Use a product whose label and technical data identify it for the intended pavement and application. Confirm equipment compatibility, preparation, and reopening instructions for that exact product.
Can you stripe over old parking lot lines?
Sometimes a product and project plan may allow recoating, but the old lines must be sound and compatible with the new coating. Peeling, contaminated, unknown, or confusing markings may need a different preparation or removal plan. Follow the paint manufacturer's instructions and verify the new layout before covering existing lines.
Should the parking lot be closed while paint dries?
Keep traffic and pedestrians away for the period required by the product directions and the site safety plan. Drying time varies with the product, application, and conditions. Do not reopen based only on appearance or a generic time estimate.
What color should parking lot lines be?
Color depends on the marking's function, project specification, and applicable rules. Confirm the color plan with the property owner or responsible authority before buying paint. Accessible spaces and other regulated markings should be laid out and colored according to the requirements that apply to the site.
Can a parking lot be striped in cold or damp weather?
Only if the specific product permits the actual pavement and weather conditions. Check the label and technical data for temperature and moisture restrictions, and consider changes during the full work and cure period. Postpone the job when conditions fall outside the approved limits.
A successful restriping project starts with a verified layout, a clean and suitable surface, paint matched to the site, and a controlled application and reopening plan. Check the product documentation at every stage, and resolve questions about pavement, safety, or local requirements before work begins.