

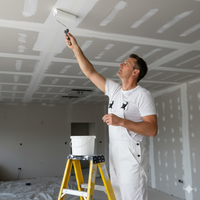




















Getting a smooth wall finish with a paint roller doesn't happen by accident. It all comes down to technique and having the right tools in your hand. If you've ever ended up with streaks, roller marks, or uneven coverage, you're not alone. A few simple choices and small adjustments can make a big difference in how your walls turn out. Whether you're painting one room or an entire building, how you roll matters.
Understanding how paint behaves, what surfaces you're working with, and which roller works best for each part of the job is the first step. Picking the right roller and using the right strokes can save hours of extra work in cleanup and touch-ups. From different roller materials to how to prep and apply the paint, knowing what to do upfront will help you work faster and end with smoother, more professional-looking walls.
Choosing The Right Paint Roller
Picking a paint roller isn't just about what’s on sale. Different rollers serve different purposes, and using the wrong one can mess up your finish fast. The material and nap length both affect how paint goes onto the wall. The wrong combo can leave lines, shed lint, or cause the paint to go on too thick or thin.
Here are the most common types of paint rollers by material:
- Foam: Great for smooth surfaces like cabinets or trim. They give a clean finish but don’t hold as much paint.
- Microfiber: Holds a lot of paint and lays it down smoothly. These work well for drywall and ceilings.
- Wool: Best for rougher surfaces. They pick up more paint and work into textured walls or textured ceilings easily.
Nap length, or how thick the roller cover is, also plays a big role.
- 1/4 inch nap: Good for super-smooth surfaces like plaster or metal.
- 3/8 inch nap: Works best on smooth to lightly textured walls.
- 1/2 inch to 3/4 inch nap: Choose these for rougher surfaces like brick, stucco, or heavily textured drywall.
Roller size matters too. A standard 9-inch roller is great for walls and ceilings. Use a mini roller, usually 4 inches wide, for tight spots like behind toilets, corners, or narrow trims. Having a few different roller sizes handy helps you switch quickly without losing rhythm.
An example: Someone painting a living room with standard drywall walls might choose a 3/8 inch microfiber roller for walls and ceilings, and a small foam roller for the baseboards. This mix lets you keep the main surface looking clean and even while applying smooth, drip-free strokes along the trim.
Picking the right type of paint roller before you even open a can of paint can save time and avoid frustration.
Prepping The Roller And Surface
Once you've picked out your roller, don’t rush to dip it in paint just yet. Taking a few minutes to prep both your roller and the wall makes a big difference in the final finish.
Start with the roller:
- Lightly dampen it with water if you're using latex paint or mineral spirits for oil-based.
- Spin it out to remove excess liquid.
- Use your hand or painter's tape to remove any loose fibers that might end up on the wall.
Now prep the wall or surface:
1. Clean the walls using a damp cloth to wipe off dust, grease, and debris. Paint sticks better to clean surfaces.
2. Patch any holes or dents with filler. Once dry, sand down until smooth.
3. Use painter’s tape to mask off trim, outlets, and edges. Press it down carefully to avoid paint bleeding through the sides.
4. Lay down drop cloths to catch drips and protect floors and furniture.
These basic steps help reduce headaches mid-project. A poorly prepped roller or wall can leave behind streaks, clumps, or uneven spots no matter how careful your technique is.
Doing the prep once means you won’t have to redo the job later. Instead of racing to fix messy lines or redo a second coat, you can focus on painting with smoother, cleaner strokes. That’s what gets you the kind of finish that looks like it was done by a pro.
Painting Techniques for Smooth Finishes
Once the wall and the roller are ready, it’s time to put some paint on the surface. Loading the roller the right way makes a big difference. If your roller is soaked or dripping, you’ve got too much paint. If it’s only wet on the ends, you’re likely to get streaks. Dip the roller about a third of the way into the tray and roll it back and forth a few times. This helps spread the paint across the roller evenly, keeping the coat controlled and steady.
When applying paint to the wall, start with a W or M shape. Then fill in the open areas without lifting the roller too often. This pattern helps the roller distribute paint more evenly, covering more space without repeatedly going over the same area. It also leaves fewer stops and starts, which are usually what cause roller marks or uneven layers.
Stick to small sections of the wall, working from one side to the other. Try to maintain a wet edge. That means you’ll overlap freshly painted areas before they start to dry. Once an edge starts drying, rolling over it again can leave marks or a film line you can’t blend out. Keep a steady pace, and don’t press too hard. Let the roller do the work. Pressing down forces paint out the sides and ends, which often causes fine lines or ridges.
Use long, smooth strokes and don’t try to stretch a nearly dry roller across an entire wall. When it starts to feel like there’s not enough paint on the roller, reload it. Consistency is more valuable than speed when you’re going for a smooth, clean finish.
Troubleshooting Paint Roller Problems
Even when you follow all the steps, things can still go sideways during a paint job. Whether it's strange texture, spots with too little paint, or leftover streaks, most issues are fixable if you catch them early enough.
Here’s a short list to keep in mind for fixes and prevention:
- Roller marks: Usually caused by uneven pressure or rolling over paint that has started to dry. Use long, gentle passes and avoid backtracking unless the paint is still wet.
- Paint bubbles: Can form if you’ve overworked the area or used the wrong type of roller. Make sure the roller is correctly loaded and don’t press too hard.
- Uneven coverage: Happens when the roller isn’t fully saturated with paint. Always reload it when it feels dry or starts dragging.
- Shedding fibers: A common issue with low-quality rollers or unprepped ones. Always check new rollers for loose fuzz and remove it before painting.
To extend the life of your roller, clean it properly after each session. If you’re working on a multi-day job, wrap the roller in plastic wrap or foil, then store it in an airtight bag to keep it from drying out overnight. Just make sure to press out as much air as you can. For oil-based paints, use the correct solvent to clean out the roller before rinsing with soap and warm water.
Reusing rollers is totally fine if they’re in good shape. Just make sure they’re dry and ready before your next coat. Toss them if you notice any shredding, hard spots, or cracks in the core.
Getting Walls That Look Like a Pro Did It
The best paint jobs always come from being prepared and working with care. That doesn’t mean it needs to take forever or that you can’t pick up the pace once you’re in the groove. But knowing what kind of roller to use, prepping your space the right way, applying paint correctly, and being ready to handle small issues as they pop up is what separates a clean finish from one full of patchy spots and touchups.
Much like any skill, it gets easier over time. After a few projects, choosing rollers, setting up your space, and working wall to wall smoothly becomes second nature. Consistency matters more than having a bunch of fancy tools. Choose good rollers, load them properly, paint in sections, and work clean. That’s all it takes to get those walls looking like they were done by someone who’s been doing it forever.
No matter the size of the job, learning and using solid paint roller techniques pays off. The walls look better, the project wraps up faster, and you spend less time fixing bumps and streaks later. When the foundation of the method is solid, even tricky surfaces or odd corners don’t feel like a hassle. Good prep and steady hands will always beat shortcuts.
Whether you're a seasoned painter or just getting started, learning how different types of paint rollers affect your results can make a huge difference in your next project. From texture to coverage, the right roller helps you get a finish that looks and feels professional. Explore the options available from Integrity Supply to get the right tools for the job.